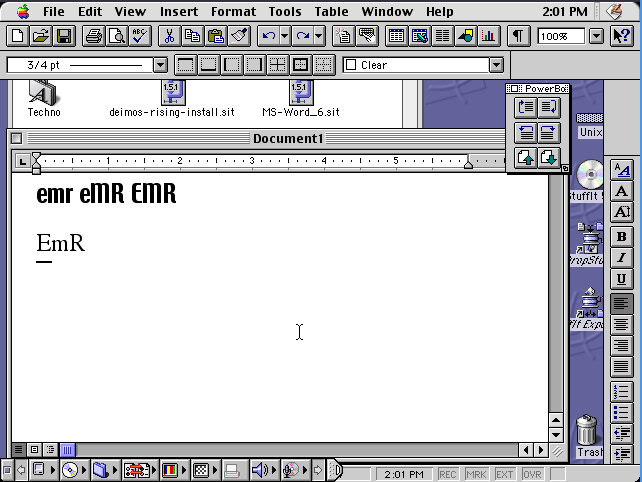
Let’s talk about something absolutely frivolous today. The tiny icon displayed in your broswer for sites, which is called a “favicon.” This is the original favicon I made in 2014 when I first set up a website. I believe I just popped open GIMP, threw in a serif typeface and spelled out my initials.
This is fine, though bland. It served me well until I busted it on my webserver setup and started serving the whole site on favicon.ico (oops!) Fixing it has given me an opportunity to make something new. Still black text on a white field (until such a time as I find a new color scheme) and still my initials. But I wanted to pick a more unique typeface. Something that really spoke to me.
When I was first exposed to computer typography it seemed like a good idea to use zany fonts in the school papers I submitted. One I probably used the most was called Techno by David Berlow. I certainly remember the feel of a full paper written in Techno–not particularly legible (especially with my atrocious grade-school spelling) but extremely slick and modern looking. It loudly proclaimed itself as something you typed into one of these amazing ‘computer’ machines (or perhaps into the microscopic screen of an alphasmart.) All that optimism and retro cred was perfect. Techno was the font for me. So I went to see if anyone had uploaded it…
Nope! It still seemed to only exist as something you could use on Classic Mac OS, the long-gone operating system last seen on the iconic G3 iMac. I saw some fonts that appeared close (ie here) but the kerning was wrong and the name is unfortunately used to refer to a type of futuristic font instead of the specific one I was looking for so googling was getting me nowhere. And I’m not the only one who was looking for it either! Luckily, we can emulate an iMac and run OS9 to create an image.
With a little bit of cropping and tweaking on the capital E, we have a new favicon:
I could stop there, but needing to emulate a twenty seven year old operating system just to get a font isn’t an adventure for everyone, so why not bring these fonts into the present? Simply copying the font files out will result in resource fork problems but luckily there was a period correct app called Font Clerk which could convert them into regular true type fonts. Here are the fonts on internet archive for your enjoyment. There may be a couple of extras in there because I installed Microsoft Word to get the above screenshot.
Happy new year! I realize that this link list is practically wall to wall downers so I invite readers to, if it would make them feel better, just watch the first link then go outside and admire the show.
Immaculate flavor of its time, “Last Updated Thu Mar 13 10:42:57 PDT 2003” web resource I stumbled across while trying to find a rumored dump of old chain emails. If anyone has such an archive, let me know.
One of those fairly obscure video game devices that you can’t find in MAME, I appreciate that someone did a write-up on at least some of how they worked.
Finally Cynthoni, who’s career has mostly been about rage against her own existence, has turned that caustic eye outwards and made a razor-edged criticism of our present moment, in the form of a banger Drum’N’Bass record. With samples of Palentr’s CEO, OpenAI’s CEO, and bass riffs reminiscent of early Pendulum, it’s sure to please a very specific set of electronic music fans.
The AI Beat
I’m pulling this into its own list so you can easily skip it if you’re tired of hearing about it.
Alt text is text used to replace an image for screen readers. It’s an accessibility feature that helps blind people navigate the web.
In this thread, a blind person explains why a bot that merely describes the images in your post to generate alt text is worse than useless, because it describes what the picture looks like, not necessarily what’s in it or what it means.
It’s also a reminder to use meaningful alt text; consider it a new year’s resolution.
This good introductory article goes a long way to explain why some (rather highly placed) folks breathlessly talk about how AI is going to kill everyone and everything but also why we should spend all our money and time on it.
I had a different, more lighthearted article about hallucinations in Google summaries that I was going to run here, but this one is a bit more serious. It gets to the heart of one of the issues with the way AI is deployed; when an AI says something, who’s saying it? I suspect that companies like google are going to cry “Section 230” and try to wash their hands of the matter. But I don’t think it’s a good fit. And I don’t think “Generative AI is a work in progress and info quality may vary” hidden behind an elipsis button is enough to cover defamatory statements.
This is an example of the way people are using AI systems in the wild. Deception and dereliction. I don’t know how anyone can read this and not see we’re in the grip of a crisis.
Anyway it’s worth it for the author photograph alone.
It’s interesting to see the other side, someone actually doing an audit of someone who’s ‘productivity’ has been boosted by extensive AI use. Self reports are one thing, but I rarely see stories of coworkers, interviewers, and others tasked with accountability. Here’s one.
Saw these in the Vermont building at the Big E. I absolutely love the idea. I actually tried to do something like this myself with a 3d print, but it came out way too warped and anyway you’d need a really big print bed and the amount of sanding required might destroy the topography anyway. Though if you want the look of topo lines maybe you’d enjoy the print lines anyway, a dry brush would make them pop.
So the Magic The Gathering trading card game used to have a website where people could comment on the cards. This was considered normal in those days. I was delighted to find out that someone had done something with the comments. I hate when worlds get deleted.
Endless Thread really living up to its potential here. This type of thing is a holy grail for retrotech/archivist fandom. Finding something unique that people find meaningful, which would have been consigned to oblivion if not for your intervention.
This is a fun relic from the time when you could really expect ‘the internet’ to ‘know’ everything. No detail of the world was too obscure to find in a Google search. It was a comfortable way for the world to be, but it’s rapidly declining.
I find this riveting radio story appealing not only because it gives flashbacks to the ouster of Westfield’s president but also because it reminds one of how gruesome the job market is right now.
What’s amazing too is that these students could have saved this superintendent from the massive embarrassment of sticking his neck out for an obviously fake hire, but he, for whatever reason, chose hubris.
Analogical Force is a very consistent label, but this one wowed me in a way they usually don’t. They’re really hitting Kraftwerk vibes with the first track off of this.
Bonus music this month, because it seems like bands like Machine Girl and Health are releasing extra albums like it’s going out of style. Features some tracks like Rabbit Season that I think reach heights the previous record didn’t hit.
This album takes RMD in an interesting direction, and after the first few tracks of kitch you get a long stretch of brilliant breakcore with lots of interesting acoustic/vocal elements.
Another surprise release, so close to MegaDrive’s last release. This one hews closer to Boards Of Canada of all things. Recommending on the strength of the beginning alone!
While Defiant isn’t my favorite Trek ship, DS9 is probably my favorite Trek show so I felt the need to rise to the occasion. Or at least gather my thoughts so I don’t need to send the same rant to multiple different chats.
Why build a defiant
Lazerpig has chosen to critique the Defiant as it was designed, not the production variant that includes a cloaking device. So I don’t think we should be evaluating its actual uses in the same way we might evaluate a ship that went into full production and deployment.
He spends a lot of time talking about why Fed ships tend to be cruisers but doesn’t really engage with why you’d maybe want to build something like the Defiant. I thought it was obvious from the dialogue; it’s meant to be a glass cannon that they could field in greater numbers than cruisers. Which makes a ton of sense if the goal was something they could launch at short notice in great numbers to rain absolute hell on some Borg cubes.
Also consider the risk of deploying a Defiant. I say “a” Defiant because Sisko chewed through two. When a Galaxy goes down the Federation is taking a massive loss in personnel and material. When a Defiant goes down, you build a new one. Everyone probably got to the escape pods because the ship is tiny anyway, but if they didn’t, whatever, what’s one squad of mutinous cadets?
Railguns don’t work in Trek, and his other intuitions seem wrong
He makes much of the battle of Sector 001 (the opening of First Contact), but really I think that whole scene shows that the Federation was prepared for the Borg successfully. They blew heck out of that cube. He for some reason thinks that Trek shields can only stop phasers and that they should simply use regular guns on the borg because Picard tommy-gunned one drone.
Maybe it wasn’t clear enough in the movie, but that wasn’t an actual gun with actual bullets, it was a hologram. So it really shouldn’t tell you “bullets always penetrate shields”, it indicates that the Borg hadn’t expected to be shot with a hologram, but they don’t do it again because the Borg adapt to new threats. There’s no indication that a railgun would be any different. You get one railgun shot and that’s it. But it’s sillier than that.
We definitely don’t in star trek, as far as I can recall, ever see a situation where ‘oops, got hit by a solid object because our shields don’t work against those’ but we get a lot of a lot of ‘bonk’ “Shields at 50%!”If anything, shields are more effective against kinetic threats. Star Trek shields presumably already work against solid objects traveling at high speeds because they are able to travel through space without getting shredded by micrometeorites, debris from exploded enemies, and other space junk. The big deflector dish is called the “Navigational deflector” for a reason. You can see this in the opening titles of Strange New Worlds; an asteroid smashes harmlessly against the gorgeously redesigned Connie. Also, projectiles in Trek like torpedoes are already solid objects–you can’t load cadaver-Spock into an energy burst. Besides, we regularly hear of probes being launched, which presumably also can’t simply sidle up to enemy ships and detonate.
Feds don’t use railguns because a phaser is a swiss army knife that can be used (by both the characters and the writers) to deal with many different situations and if you have the right intel can bypass enemies shields. The writers can only do so much with flung metal; a scifi beam can do cool scifi things as needed, and that’s exactly the type of flexibility he himself highlighted in the beginning of his video.
But suppose your targets shields are down, one might object. In Trek, an unshielded target is already dead. A single torpedo can usually destroy an unshielded ship, or you can board it, or use your transporter to space the entire crew, or use your phasers to disable its weapons to have a nice chat. All that is to say, Trek weapons are judged mostly on their ability to strip shields. Considering how effective shields are at keeping a superluminal spaceship from splattering on interstellar dust, I think it’s safe to assume that they’re more effective against solid objects than they are against energy weapons.
But it gets worse for mass drivers. Conventional projectiles are simply too slow to be effective in an environment where targets can maneuver faster than light. You’re not going to be able to hit stuff with a railgun in Trek. The speed of light is the bare minimum and only effective at “both ships are on screen at the same time” range.
Sourcing issues
This is personal preference, but I don’t like his sourcing. He says Star Destroyers must not be do-anything ships because there are a million variants, but there are only a million variants because people writing what’s basically blessed fanfic all want to add new space ships. On screen they use one or two variants per trilogy. Similarly, his harshest criticism is centered on basically the deck plan of the ship from the technical manual that only exists to look cool and be nerdy. It’s a fictional spaceship and he barely touches on the way it works in the fiction, instead focusing squarely on ancillary minutia. Maybe this is part of his format because he usually talks about real life vehicles and the information is factual. But in a show like Trek, the only truth is the show that ends up broadcast. Treating outside information as gospel is, in my opinion, silly. A Star Trek spaceship isn’t a collection of statistics, it’s a prop used to tell stories and it’s more or less whatever the story needs it to be.
It’s just a game, who cares
I just want to add the caveat that this is a frivolous response to a frivolous piece. In defending the honor of a fictional spaceship I’m not trying to drag down your favorite YouTuber or anything. If something genuinely animates me it’s people’s attachment to learning off-screen minutia about fictional worlds. You’re investing your precious attention on something that can be invalidated at the stroke of a screenwriter’s pen!
I got the impression that Pig spent more time reading technical manuals in his research than he did watching DS9 and that’s a shame because it’s great fiction and challenges the audience a lot more than arguing about the utility of a detachable crewed missile module does.
TL; DR
Would you rather have one Galaxy or Twenty Defiants? You want the Defiants.
I heard about this one through respected retro computing channels, so my expectations were relatively high.
It doesn’t bill itself as such, but it’s really one of those museum collection books, in this case for the Center for Computing History. This is a fine genre, but understand that’s it is, deep down, an art book. It’s there to inspire, not as a research tool. The photographs are, therefore, artistic rather than documentary. It’s an industrial design coffee table book as much as it is a chronicle of computing.
Some reviewers have disputed the accuracy of the histories and I can’t speak to that except to say that I would have preferred the book cite its sources and spare one or two pages for a bibliography.
I appreciate that the iMac G3 is included as a sort of pinnacle of PC design though.
Article about a scam in the Pokemon card collector community with good flavor on the collectors themselves and an interesting resolution. Proper caper.
I picked this one up as research for some pessimistic scifi, but was excited to see the creator behind SMBC anyway.
It delivers on its premise; it will convince you that we are not within striking distance of sustainable off-world human life. But Kelly’s Endurance already told me that. City is lean despite its size. Regular asides on Space Cannibalism and cartoons are fun but they are taking up space that the Weinersmiths could have spent better fleshing out their ideas. And to be fair to the Cartoonist author, who’s comics have always relied much more on dialogue than visuals to convey their humor, but the illustrations don’t really feel necessary. The last couple of chapters read like surveys rather than fully formed persuasive arguments.
It starts out strong though, and perhaps because it’s also written by a Biologist, it does a great job laying out the known and unknown issues with keeping humans alive for extended periods in the harrowing conditions of space and other-than-Earth planets. Oft-neglected points like the need to essentially create a fully functional biosphere, something we struggle to do even on Earth, are given lots of attention in those early chapters. They clearly relished the chance to describe just how horrible moon dust would be for equipment and astronauts. There’s also an extended discussion of the unknowns surrounding human development in space from conception on; we’ve traditionally only sent adults but an off-world colony couldn’t sustain itself indefinitely without kids.
They’re less confident talking about social factors. They spend an inordinate amount of time explain how we probably won’t get Space Madness, but that we would require infrastructure for dealing with behavioral issues. When they get to the real meat of the sociological issues–that creating off-world colonies means creating societies that might out of necessity make peace with inhuman conditions and in the process lose some of what makes them human, and that such societies could become a threat to Earth–they barely touch it. It’s not as if Expanse (its authors give a back cover quote) didn’t already turn everyone on to a version of this, but I would have liked a more in-depth treatment. It feels like a pulled punch.
Perhaps they chose not to dwell on colony cultures going sour because they figure colonies will be so dependent on Earth that any sort of rebellion is impossible, which is reasonable. But rebellion isn’t the only threat. Ruminating on and accepting the sorts of inhuman tradeoffs “necessary” for a sustainable society off-world could be used to shift the Overton Window in the here-and-now. I don’t think the authors wanted to present space fantasists as horrifying ideologues, but this was of course published before the most famous Mars advocate on our planet gave a salute that would have made even the Militaristic Martians from Expanse blush. In that light I think we do need to ask those questions, and I wish they’d been a bit harsher and less apologetic about spoiling everyone’s fun.
That is not to say I didn’t like it or that it wasn’t good. Their overall premise that you need to send a whole civilization was convincing. I just wish it had allocated its resources a little differently.
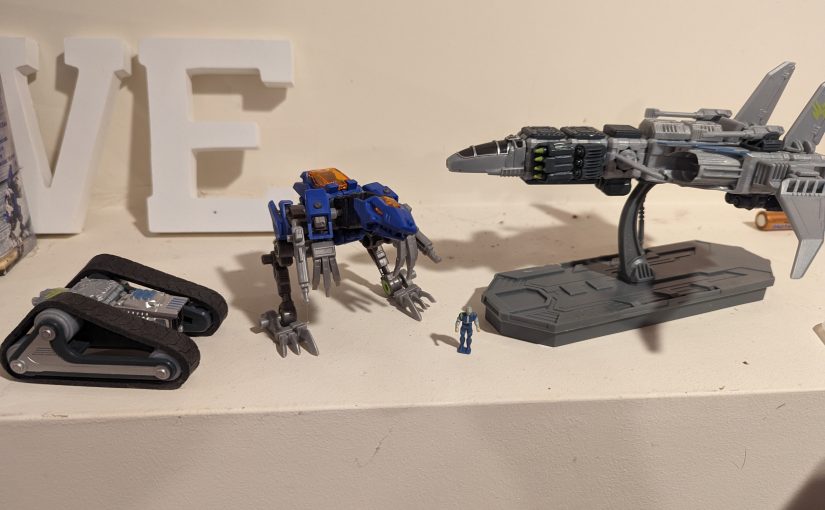
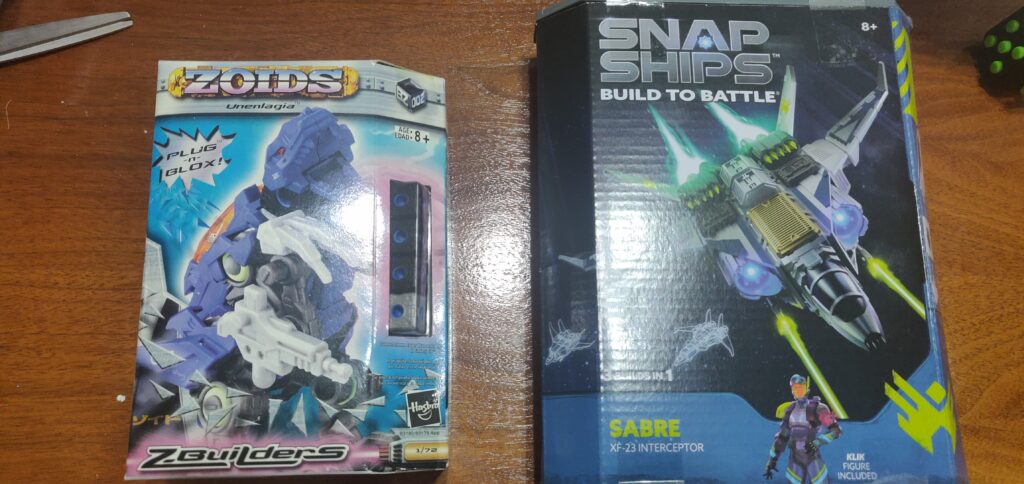
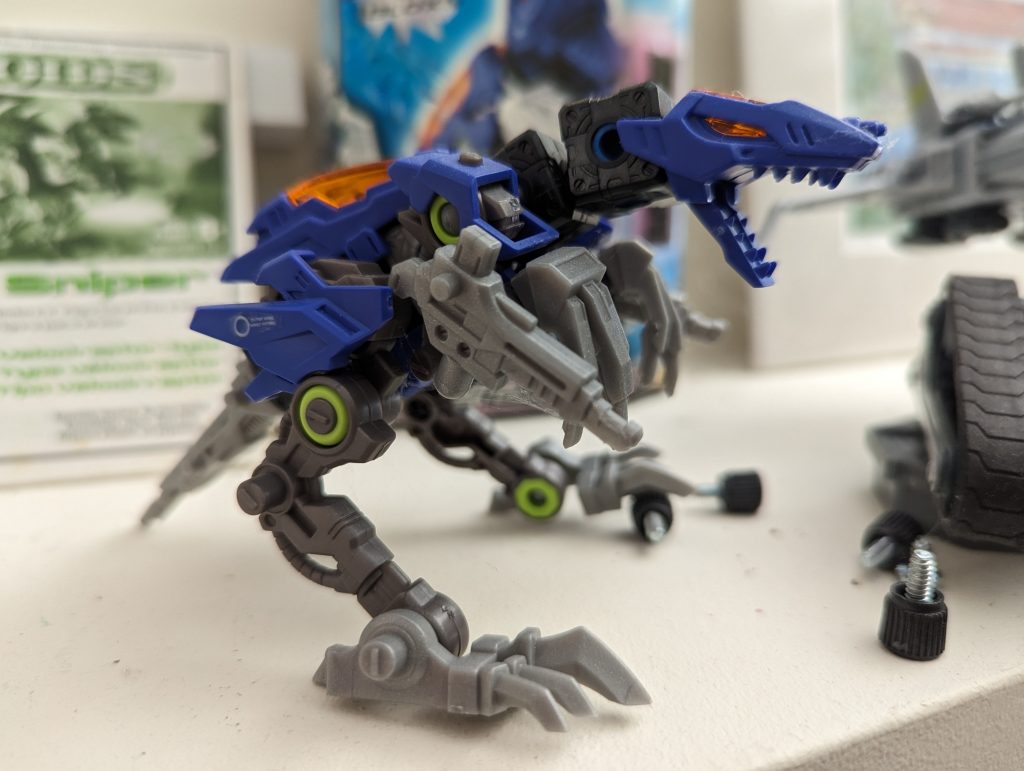
A long time ago, I got my hands on Zoids Z Builders (aka Blox) and thought they were pretty cool, but didn’t really chase it further. As I sometimes do, I wondered if there was a modern equivalent, so I looked for ‘scifi robot cube building toys’ and found SnapShips. Over a decade after the debut of Z builders, it’s worth comparing these cube-and-greeble 1/72 scifi building toys of past and present.
Z Builders
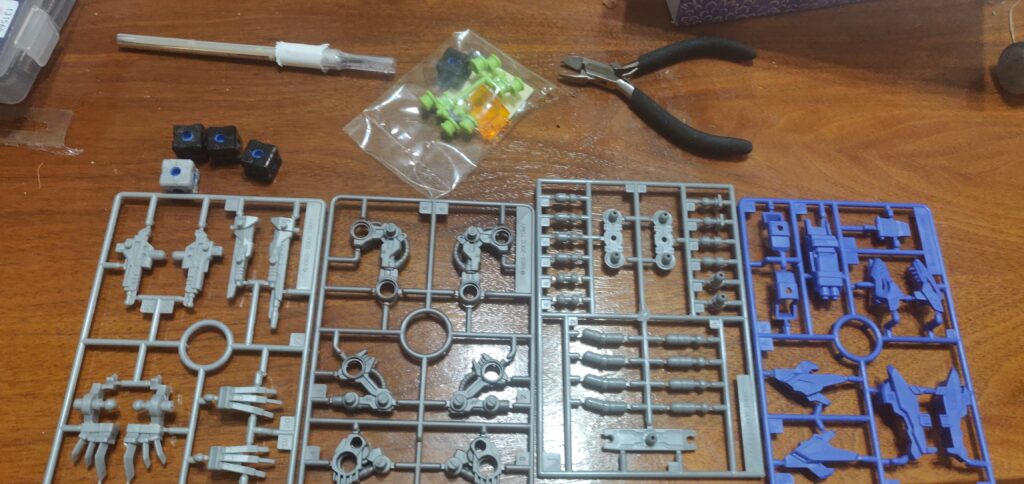
Sprues!
The first thing you notice about the Zoids model is just how much of a capital ‘M’ Model Kit it is. Previous Zoids figures where less toy like-they where a little more like something you’d see from Tamaya or Airfix, though they contained motorized play elements. Z builders adds freely moving joints/possibility and a building system instead of a windup mechanism, but you are still looking at sprues when you first open the box, and decals when you finish the build. Like some Gunpla kits, the sprues are made of different colored plastic so no paint is required for a half decent paintjob.
Feel human, use tools
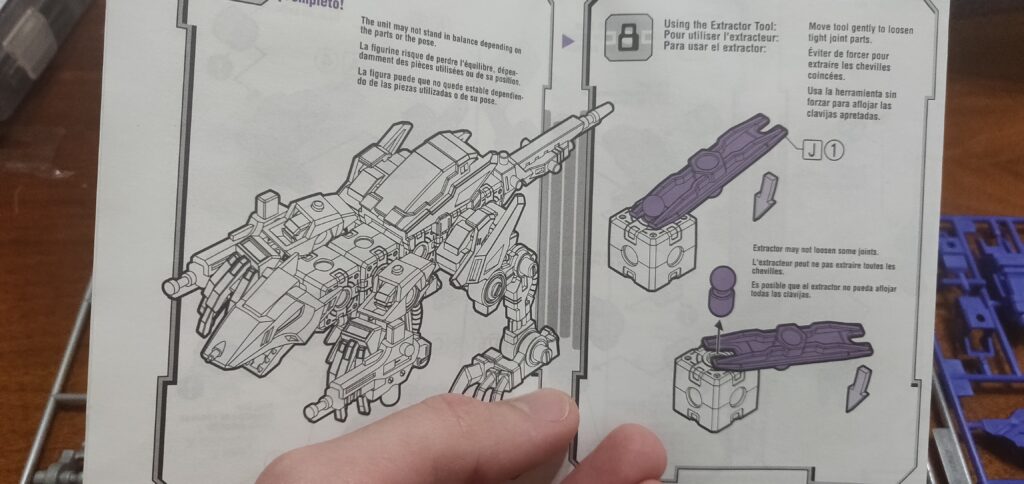
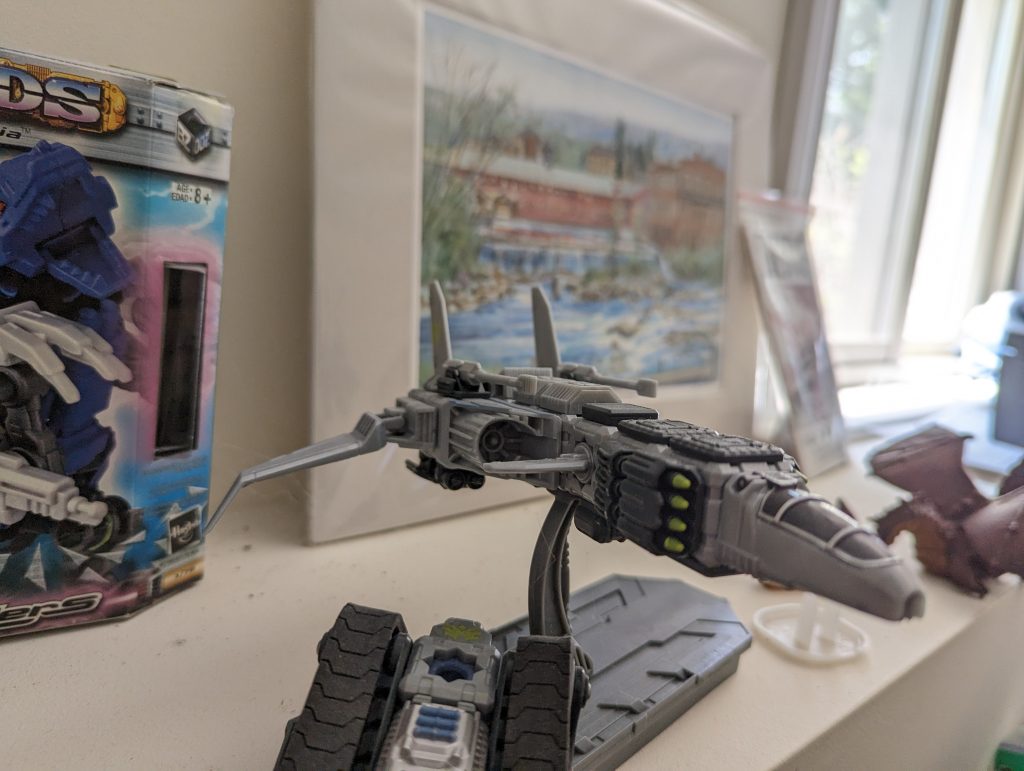
One interesting similarity between ZBuilders and SnapShips is that they both include a small tool for disassembly. SnapShips include a spudger, and Zoids ships with an ‘extractor tool.’
Zoids ‘blox’ elements are 14.7mm, and no rounder in inches.
The stickers are a pain. There is no guide so you have to sort of look at the box and figure out where they go, (again) more like a traditional scale model. They are in a grid and the squares are much larger than the places you need to put them, so you have to cut them to size. After all that, they don’t go on super clear. Wet transfer decals would have been better if they’re not going to die cut them anyway. They do add a nice sense of scale though.
The model is somewhat poseable. It won’t really hold a pose that involves much weight because the rubber joints are rather weak. It’s possible that the decades since it was manufactured have taken a toll on the rubber. Still, robotic dinosaur: very cool. Timeless even.
Wonder how it’s supposed to reload that arm gun without opposable thumbs? Perhaps its teeth…
SnapShips
SnapShips cube elements are 20mm
The SnapShips have much more detailed, Lego style instructions but they aren’t really as needed if you want to build it like a puzzle. The blocks lock together so that rather than flexing, they hold a specific shape. The parts are all in bags – no sprues which is honestly kinda chaotic.
The SnapShips contain three alt-builds each, similar to what Lego does with its Creator theme. I built the forward-swept wing design rather than the front-of-box design.
SnapShips give you tons of rectangular greeble panels, but a cube is relatively large compared to the scale so all of the vehicles you make will turn out very blocky. There are relatively few specialized pieces besides the aforementioned panels. Between sets there’s a strong compatibility at least – there’s only two color schemes. You get prints instead of stickers too. I think the appeal may be limited for SnapShips though. Trying to make something sleek out of something so boxy is going to be a challenge with the part set available, and the boxes are so big compared to the features people will want to capture is going to make that rectilinear form stand out.
Something else to consider about SnapShips is that it’s got a full blown tabletop war game of all things associated with it. Apparently it’s quite similar to X Wing. 1/72 is sort of a huge scale for dogfighting, but some reviewers seem to love it.
It’s always fun to find out about a project after it’s delivered something rather than before.
Lego Island was one of the first 3d games I watched my PC fail to run back in the day. But even if you don’t have a strong affection towards this particular game, it’s really interesting to see what a practical decomp project looks like. Often decompilation is used in malware analysis-trying to rebuild a nontrivial PC game like this is rarely a successful project. Kudos to the devs.
Some enterprising Redditor has taken it up on themselves to log and review all of the free audio plugins they’re trying. There’s a vast ocean of free Audio Plugins out there, so this is useful. Over a hundred plugins reviewed. They have a YouTube channel here.
If you’re an Arcade Fire fan the question is probably not ‘Did pink elephant suck’ but rather ‘was Suburbs the last good album or Reflektor?) Not the single best article to come out about this record, but maybe the one that best captures the disappointment. The record feels, dare I say, court mandated.
So here is a strange question. I underestimated just how sharp exacto knives are while cleaning up the seams on my minis. Can i just use the plastic glue to seal it rather then keep changing bandaids each time it comes back open and bleeds again?
When I saw this, I realized I really did need to write this up. I cannot allow the public to remain uninformed any longer regarding glue!
Plastic Cement
Also known as: Plastic Glue
This stuff smells like nail polish remover, and it’s no coincidence: they both use Acetone. The Acetone in plastic glue liquefies the plastic surfaces and when they re-harden, they’re very well stuck together. Cement is right; this stuff creates very strong bonds. The drawback is that it’s only good for specific plastics; the sort of polystyrene that you see in typical model kits, but it won’t work if you’re attaching a rock to a base or working with resin parts. It also won’t bind up your skin (otherwise nail polish remover would be far more dangerous. If you take nothing else from this article, take this:
You cannot close wounds with plastic cement!
If something is stuck on with plastic cement, your best bet for cutting it off.
SuperGlue
Now, I’m not a doctor, but I’m assured you can close a wound with superglue. It certainly sticks robustly to skin. Cyanoacrylate, the technical term for this type of glue will readily bond skin, so avoid using it without gloves. If you do, I recommend GoJo. CA glue will work with a variety of materials and form very strong bonds, but it has a few drawbacks: it’s finicky about setting. You get a few seconds to hold your bond steady (pressure is good) and then the glue is no good, you’ll need to try again after removing the now-spent glue. If you glue painted parts you need to make sure you don’t get glue anywhere visible, because it dries opaque. Its quick setting can be an asset though; you can pull off poses that would be slightly trickier for a longer setting glue. I hear you can freeze it off, but I haven’t had success with this myself.
PVA Glue
PVA glue, also known as School Glue, is also used in wood glues. It’s the least consequential of glues; you’re not going to poison yourself with it (unless, I imagine, you drink it) and if it sticks to your fingers you can can just wash it off, or rub your fingers together for a few seconds. It’s popular for basing because it’s thick, goopy, and easy to fix if you make a mistake; just add sand! You can even get it premixed with sand in the form of nice basing paste. It can be dissolved by soaking in water for a day or so and then scraping off with a toothpick.